Thursday, September 30, 2010

Peace Within

Hello everyone!  Here is my "project" for today! I am so excited about it and I really wish I could get my camera to convey what my eyes see.  Everything is always so much better in real life.   But,  I hope the pictures can convey just a little bit of the true color. 

I started off making one card.  This is it:
 I used the stamp set Peace Within and used Concord Crush DSP from the Design Patterns Hostess Set.  I didn't stamp the bird which is a part of this stamp.  I just wanted the basket.  I really loved the way it turned out.  Of course, the stamp is colored with SU markers.  I really, really liked the way  this card turned out so, I thought, hmmmm....  I could make a set and make one using each new In Color!  Genius! :)   So here is the set:
What do you think????   Here are the other colors individually. (Remember, if you would like to see the photo larger, just click on it.)
Blushing Bride
Peach Parfait
Pear Pizzazz
Poppy Parade

Technique Tips:
- I colored the flowers so they would complement the card base color, i.e., for the Concord Crush I used purples, for Blushing Bride I used pinks and roses.  For the Pear Pizazz, Poppy Parade, and Peach Parfait, I used similar colors, all earth tones - I actually used Poppy Parade and Peach Parfait in the flowers as well as yellow, more mustard - colors like that.
- I used Certainly Celery to "draw" the stems.  It went "outside" the lines so to speak, but it added depth and color to the inside of the basket.
- For the Poppy Parade, Blushing Bride and Pear Pizazz cards, I actually added a little bit of those colors into the basket.  If you look close, I got a little carried away with the Peach Parfait, but hey, it works, lol!

 I was going to try to make a box of some type to put them in, but I had more of those errands to run today and I would never have gotten to post these today, so maybe that will be my project/post for tomorrow. We'll just have to wait and see! ;)

Blessings to all!
Terri


Wednesday, September 29, 2010

Thoughts & Prayers

Hello everyone.  It is never a happy moment when I HAVE to make a sympathy card. However, this was the unfortunate occasion for me yesterday. I just found out that a good friend of my family's lost her grandson last week.  He died of an IED explosion in Afghanistan.  Just a young 23 years old.  So, it was with a heavy heart that I made this card for her. 
I have known Ms. Betty for over 30 years and know what a tragic loss this is to her and her family.  I ask that you pray along with us for God to provide a peace and comfort that we know only He can give.

Here is my card recipe:
Stamps:  Thoughts and Prayers
Paper:     Cajun Craze, More Mustard, Early Espresso,
                  Very Vanilla
Ink:         Early Espresso, More Mustard, 
               various SU markers for the leaves
Other:     Square lattice EF, Flourishes Texture Plate

Technique Tips:
- Once again, I used my SU markers instead of an ink pad.  This enabled me to color each leaf individually.
- I intentionally sponged the corners darker to give it almost a photo corner effect.

That's it for me today.  I'll be back tomorrow with more than one card.  I can't wait for you to see them.

Blessings to you all!

Terri

Monday, September 27, 2010

SC 299

Hello everyone.  It's Monday and I've got the blues.  It's raining here and I just haven't felt like doing much all day.  However, I did make a card.  I really wasn't feeling like it in the beginning, but once I got started, it moved along.  This is my submission for Split Coast Stamper's Card Challenge for September 22.  Here is the LINK for the challenge.  I really like this layout.
I tweaked mine just a little.  My image was a little bigger than the sketch so I had to downsize the sentiment, but I think it fit nicely.

Technique Tips:
- I used my SU markers on the stamp so I could add the red for the flowers.
- On the Just Believe stamp that has the flowers and block image, I just used the block.  Again, I didn't have the room.  I tried using just one side with flowers, but it didn't seem to work right.

Here is my recipe:
Stamps:  Just Believe
Paper:    Love Letters DSP, Red Riding Hood Red,
                black, very vanilla
Other:    SU markers in Black and Red Riding Hood Red

This one was simple. Eazy, peazy!  Try this sketch for yourself.  The great thing about the SC sketches is that they are true to life.  You can measure and make them as is, or tweak them if you like! 

Have a great day!

Blessings,
Terri

Friday, September 24, 2010

Card Wallet

Happy Friday everyone.  I did not get around to posting yesterday.  I am not sure where the day went.  I had many, many errands for one thing.  I kind of let those pile up on me and then I make a day of it.  And it was a day; but productive.

I am so excited about today's posting.  This is another first for me.  I have always posted cards and this falls into the "anything but a card" category.  Let me give you some background on this project before I show it too you.  I am also going to have the tutorial for this for you.  My friend and fellow Rapid Stamper Club Member, Barbara Borthwick has been visiting family for the past two months, gasp!  Can you tell she's retired? :)  Anyway, while she was in California visiting one of her children, she went to a Stampin' Up class and made this project. I am calling it a card wallet.  I am sure it has another name, but alas, I don't know what it is.  I fell in love with it when she showed it to me.  I borrowed it from her; scrutinized it; measured it, etc., etc...  No, I did not take it apart!  And then I made one!!  I messed up the first time, forgot  something and had to start over.  Breathe, Terri!  So, I was more patient and didn't mess up this time!  I love the way it turned out!
Here is my card wallet:

Here it is opened up.
Do you like it??   I love the way it turned out.  It will hold four cards; two in each pocket.  Maybe three if they don't have a lot of layers.  It was really easy to make.  I plan on making more.  Here are the directions!

There are two sheets to this project. 
Sheet 1 - is 12 x 10
Sheet 2 - is 8 1/2 x 6 6 1/2

Sheet 1 - on the 12" side:  score at 5 3/4, 6 1/4

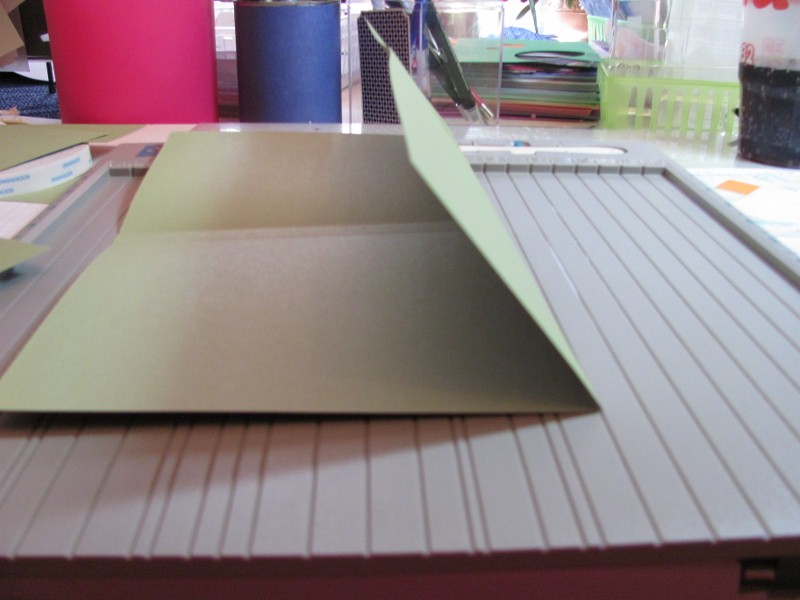
If you are using Scor-Pal, there is no score line for 5 3/4". There's no line for it on the Scor-Pal.  But easy enough to do.  Just move your paper over 1/4 inch (Line it up with the quarter inch marks on the far right of the Scor pal.) It will then look like you are scoring at the 5 1/2, but you are not.  There is half an inch between scores, so the second score mark will look like you are scoring at 6, but it is really 6 1/4 since you have moved your paper over 1/4 inch.  Eazy Peazy.

Rotate your paper to the 10 inch side and score at 3 1/2

Sheet 2:
On the 8 1/2 inch side score at 5 3/4 and 6 1/4.  Adjust if using the Scor-Pal (noted above). 

Fold your score lines on sheet 1.  I folded the inside lines first, then folded the bottom score line.


Tape sheet 2 to the right side of sheet. (It should be taped to the outside of the 6 1/4 score line. Fold your score lines on sheet two.  This is the flap.
Add sticky strip to the outer bottom sides and the inner bottom between the score lines. I used 1/2 inch sticky strip to fit the inside and I used 1/4 inch sticky strips on the sides so it won't take up the needed room for your cards to fit inside.


After adding your sticky strip, fold the bottom half up. Refold your score lines down the center. and fold over.  You are almost finished.  You can decorate however you would like; add ribbon or not.  Use self adhesive velcro dots for the closure.  Here's the inside picture again, so you don't have to scroll to the top.

I also used 1/2 sticky strip to adhere my ribbon to the inside of the flap.
And here is the final product again:

Here are the items I used:

Paper:   Pear Pizzaz, 12x12 sheet and 81/2 x 11 sheet
              Early Espresso CS, and Greenhouse Gala DSP
Other:   Chocolate Chip Ribbon
             self adhesive velcro dots, sticky strip

I hope I didn't confuse you too much!  If you have any questions, please fee free to email me!

Have a wonderful weekend!

Wednesday, September 22, 2010

Clean and Simple Anniversary

Happy Hump Day everyone.  I have a very clean and simple card for you today.  I need two anniversary cards.  One specifically for a 25th wedding anniversary.  I thought of this idea, but I'm not sure if  I am going to use it or not.
Is it too simple??? Too plain???  Please tell me what you think.

I only have two helpful techniques for you.

 - You may already be doing this, but just in case you are not...  I  used dimensionals on the numbers.  Instead of using one of the octagons to cut up (the shape the SU dimensionals come in), I used the outer remnants on the page:
I placed my tweezers on the outer edge. They look like a zigzag design.  These are great for cutting up in smaller pieces and using for those tiny areas, like the numbers.  This keeps you from having to mess up one of your whole pieces.   Waste not, want not, my mama always said! :)
- Secondly, I used  circle nestabilities for my "rings" ; the standard circles small and the standard circles large. I used the smallest die in each of the circle sets.   I placed the smallest into the next smallest size which created the "cut out".  Just run them through your Big Shot and you have your ring.  You have to do this twice of course for two rings. To interlock them, I cut one ring, slid the other into it and made sure I glued the cut ring behind the whole ring.  Eazy, peazy.  I guess I should have taken a picture of the nesties.  I'll try to add it in tomorrow. 

Recipe:
 Paper:  Brushed Silver, white
 Other:  Sizzix Timeless Type Alphabet Dies
           Perfect Details Texture Plates, Ptrn #1
  (this is the same pattern as the Wedding Sweet Stamp Set)
            Spellbinders Circle Nestabilities

I have already made tomorrow's post project!  Yay!  I am so excited about it.  It is actually not a card!!!! ????  You'll have to wait.  I can't wait to show you!

I hope you have a wonderful evening.  Until tomorrow...

Blessings,
Terri

Tuesday, September 21, 2010

Unchartered Birthday

Hello everyone!  I actually was going to use this week's Mojo sketch to make this card.   Well, it didn't go as planned.  I really, really needed a masculine birthday card for one of my nephews. His birthday is next week.  I knew I wanted to use the sailboat from Uncharted Territory.  After creating that part of the image, I just couldn't get the rest of it to fit.  I knew I was going to have to turn the pattern sideways - here's this week's sketch:   


Here's my card:
As you can see, It's flipped on the side, I left off the bow, left off the three embellishments and moved over the sentiment.  Not really the same, but close? :)
    Creation Tips:
 - I stamped the boat from Unchartered Territory. Then I made a mask of the boat, so that  I could sponge the water. The colors I used were Marina Mist, Pacific Point and Night of Navy.  I made the blues darker along the horizon.

 - Next I made another mask for the water, so that I could start sponging the sky.
This is a picture of the first attempt I made at the sky sponging process, so you will see the lower part of the sky is more red and there is the moon.  I had to start over and this time, I left off the moon or the sun whichever it is, so that I could make the sky whatever I wanted it to look like.  The colors I used were: Daffodil Delight, Peach Parfait, Pumpkin Pie and Rose Red.  I also, rethought my sponging process.  Instead of going straight across like I started out doing, I started in the center of the boat and made a small circular pattern then worked outward with the darker colors blending as I went. Then darkened the top corners and along the horizon.
- Oh, one thing I forgot.  I used Black Stazon and before putting stamp to paper, I used the Cherry Cobbler SU marker to mark over the smaller sections of the sail on the stamp and then stamped on paper,  as you can see in the final card.

- I used my white gel pen to mark over the waves.
- I sponged Peach Parfait and Rose Red on the sentiment, from Watercolor Trio
- The strip going across the length of the card is from retired DSP Raspberry Lemonade. It has rich razzleberry running through it which pulls out the Rose Red in the sky!   I wish you could see it in person.  It is vibrant and stunning. I keep pinching myself!  I can't believe I made this!  YAY!  I might be getting there.  Of course, this was my second attempt at the same ocean/sky.  Got to keep myself grounded;)

That's it for me!  Have a wonderful evening.  Maybe I'll attempt Mojo 157 again and hopefully it will conform more to the original sketch!

Blessings to you all!
Terri


Monday, September 20, 2010

Thankful Home

Happy Monday!  I hope everyone had a wonderful weekend.  This card I made Sunday afternoon and I have to say, it took me awhile.  I had an idea in my head and it took some time to create.  It was actually the watercoloring that took most of the time. I am soooo trying to be like the infamous SCS watercolorer Karen Barber. Here is the card:
 Normally, I put the stamp recipe here, but I think I am going to start with the techniques first!

Creation Tips: (This is a 4 1/2 x 4 1/2) card.
  -  I knew from the start, that I wanted to make the vegetables look like they were sitting on a table.  So, when I stamped the corn/pottery, I made sure I had enough blank space to place the pumpkins and have "wall space".

   -  I stamped the corn and jug (one stamp) in Timberland StazOn and then I took my Pacific Point Blue Marker and on the stamp, I went back over the design on the pottery. 
         - I used the Basic Grey Stampin' Up marker and a blender pen to provide shadowing on the pottery.
        - I used Old Olive and Garden Green along with some Soft Suede on the husk.  I used So Saffron and Daffodil Delight on the corn.  I left some blank areas to make it look like the white kernels. 

 -I then stamped the pumpkins colored them with Peach Parfait, Cajun Craze, Daffodil Delight and some Pumpkin Pie. I cut out the pumpkins.

- I cut out DSP about two inches deep for my tablecloth.

- With scissors, I had to cut out the bottom of the corn and up the sides, so that it would "sit" level on the tablecloth.  I then glued the corn/pottery and "walls" to the tablecloth.  I then glued the pumpkins next to the corn.  You can trim the sides and top to make the size card that you would like.

- The "Give Thanks" stamp, I hope looks like it may be a cross stitch piece in a frame.  I hope!!  This was actually a mistake that I think turned out pretty good.  I stamped the Give Thanks as just a sentiment and I didn't like the placement or the way it looked.  I thought of using the Sizzix labels die to make the frame and I that's when I thought it looked like a frame on a wall!  I think it turned out pretty good!  What do you think???

Here is the recipe:
  Stamps:  Harvest Home, Holiday Greetings (Retired)
  Paper:    Watercolor paper, Old Olive, 
                 Early Espresso, Autumn Spice DSP
  Ink:      Timberland Brown StazOn, 
              Various Stampin' Up Markers
  Other:    Sizzix Labels Dies

That's all for me today!  I hope everyone has a great evening.

Blessings to you all,
Terri